Current Version
Version 1.701 from 25.3.2016
Modifications:
- Read of SpeedcamUpdates.spb files
Version 1.607 from 10.12.2011
Modifications:
- Tool to switch On-Off GPSlogs in the Navidesktop without connection to a PC.
Version 1.606 from 9.11.2011
Modifications:
- Support of the series Active, Ready und Professional with IGO8
Version 1.604 from 8.2.2010
Modifications:
- Automatic creation of error protocols
- User Interface modified (Labels)
- Bugfix loading icons and caption on language switch
Version 1.603 from 12.5.2010
Modifications:
- Bugfix Multi ASC import
- Speedcam import
Version 1.601 from 15.3.2010
Modifications:
- KML-Import modified
- Multi ASC import
Version 1.507 from 17.2.2010
Modifications:
- User Interface modified
Version 1.506 from 17.2.2010
Modifications:
- ASC (CSV) Import extendet
Version 1.101 from 2.9.2009
Modifications:
- Support .png - format for Icons
- Bugfix for read .bmp -format
- Changed KML - format reading
Download:
Version 1.101 German from 11.9.2009
![]()
Version 1.101 English from 11.9.2009
![]()
Older Versions
Version Beta 1.0 English - 13.5.2009
Modifications:
- English translation
Version Beta 1.0 - 16.3.2009
Modifications:
- ASC (CSV) import
- Resizing icons
- Bitmap Designer 1.1 Beta
- Edit icons
- User interface
Version Beta 0.88 - 26.2.2009
Modifications:
- Revised KML import
- GPSlog On/Off - Button
- User interface
Version Beta 0.82
With this tool you are able to include KML-files with an icon to the Becker Z201, Z100, Z..., Active, Ready und Professional with IGO8 System.
New function in Version 1.607 On-Off GPSlogs
Tool to switch On-Off GPSlogs in the Navidesktop without connection to a PC.
You can find this menu in the path Media/Games/KmlKonverterToolService.
This is the menu in the Becker Navi to switch on - off the GPSlog.
New function "Multi read ASC file" in version 1.601
Collect several ASC-files to one KML-file.
Requirements: All files are in one folder. ASC-files and Icon-files have the
same name.
Example:
Aldi.asc Aldi.bmp
Lidl.asc Lidl.bmp
Discounter.bmp
First use function "Multi read ASC file" to
read the root icon.
Then select the ASC-files. Use the file selection in Windows style.
Example: root name is Discounter.
Then you get this structur:
Discounter I
I- Aldi
I- Lidl
After this, save the KML-file and the icon using "Save
icon" to the Becker
navigation system.
! Attention !
Use at own risk.
The developer does not take responsibility for disadvantages.
The software is freeware, if used privately.
Commercial use only with the agreement of the developer.
By downloading and/or using the software you have accepted the conditions mentioned before.
- KML-files saved on the pc
- An icon-file at 22x22 pixel as a bmp saved on the pc
- Service Release 1 installed on the Becker navigation system
- Becker navigation system connected over USB to the pc
- Microsoft .Net Framework 3.4 or higher installed
- Primarily OS Windows XP or higher
Tip:
If there appears an error message like this at start
up:
"Application failed to start because side-by-side configuration is
incorrect."
we advise to install the "Microsoft Visual C++ 2008
Redistributable Package (x86)"
- Connect the Becker navigation system over USB to the PC.
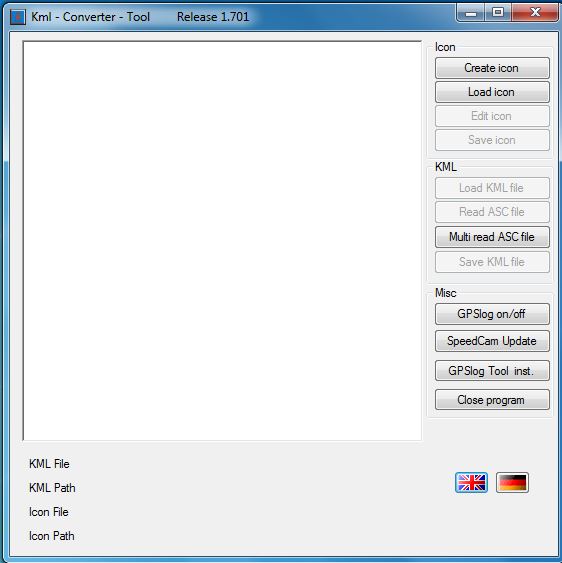
- Open the program.
- "Load icon" respectively "Create icon"
(The screenshots will be updated soon)
The loaded icon will be shown as a small preview next
to the filename.
The icon can yet be edited with the Bitmap Designer by clicking on "Edit
icon".
- "Load KML file" respectively "Read ASC file"
- Characters like: < > & ´ are not allowed in the text. They are parsed as control characters.
Now the icon is connected to the KML file and the KML file is corrected in view to control characters and umlauts.
- Execute "Save icon" and "Save KML file" in the next step.
The size of the icon can be adjusted with the dialog showing up when saving the icon.
The following list can be used as a clue:
- 22x22 - Standard
32x32 - Large, comfortable
48x48 - Very large, may cover parts of the map
The icon will be saved in the directory \IGO8\my_icons.
The KML file will be saved in the directory \IGO8\CONTENT\userdata\poi\
.
After disconnecting from USB the Becker
navigation system reboots
and generates the required files.
This procedure may take some time. Please do not switch off.
Afterwards, you have to select the new category under
"Settings -> Navigation settings -> Map info -> Select POI categories -> Select POIs"
to display the POIs.
Import of Speedcam - Files (Danger spots) SpeedcamUpdates.spb

Import Speedcam - File "SpeedCam Update"
Disconnect the Becker navigation system from the PC and start the Becker navigation system.
After that change the settings in :
"Settings -> Navigation settings -> Danger spots"
! Attention !
To change the settings you must have a GPS signal!